The BEST Miso Chocolate Chip Cookies
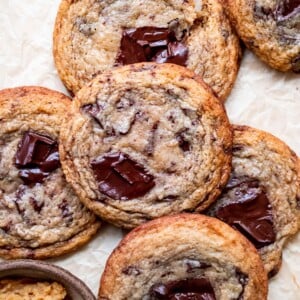
Flavored with sweet white miso, these easy brown butter miso chocolate chip cookies are rich, decadent, and full of chocolate. The white miso gives them an extra boost of flavor, making them quite literally some of the tastiest cookies I’ve ever made. Included in this blog post are special tips and tricks on how to make the absolute best cookies!

Last week I went to a food event at Ryla, an awesome Japanese American restaurant in LA. I honestly think most of these are okay, and I mostly go for the free food. But I was pleasantly surprised last week! Last week’s event was about this amazing thing called Koji which is a fermentation catalyst or fungus that goes into making pantry favorites like shoyu, miso, mirin, and rice wine vinegar. That event inspired me to step out my comfort zone with these miso chocolate chip cookies.

Why I used white miso for these cookies
White miso is made by fermenting soybeans with a large percentage of rice. The resulting miso is sweet which makes it perfect for desserts like cookies and miso rice krispie treats. It’s also great for lighter savory recipes like salad dressings. In contrast, red misos are saltier and more pungent, and yellow miso is somewhere in the middle flavor wise.

Some key ingredients you’ll need
- Light, dark, and granulated sugar – Through testing, I found that the perfect chewiness (in my opinion) and sweetness come from a combination of all 3 sugars. Light and dark brown sugar make the cookie chewier and the granulated sugar helps give it that crispy edge. You can definitely only use light or only dark brown sugar if that’s all you have. Dark brown will make the cookies sweeter and chewier, and light brown sugar will result to less sweetness and less chewiness.
- White miso – This ingredient adds yummy rich umami flavor to the cookies. Do not substitute white miso for other varieties like red miso. Red miso is very salty and pungent which would not go well in these cookies.
- Dark chocolate – I personally like using a 4 oz chocolate bar like Baker’s chocolate bars because you get different sizes of chocolate which helps you get that professional chocolate chip cookie look. I’ve tested these with dark chocolate chips, and they’re good but not quite as good as these chocolate bars. See similar results in my chai spiced chocolate chip cookies. They also tend to melt better. If you choose to use chocolate chips, use 1/2 cup of dark chocolate chips.
How to make miso chocolate chip cookies


Tips on how make the perfect miso chocolate chip cookies
Ingredient Tips
- Use all room temperature ingredients. This really does matter because butter and eggs don’t like to mix together, especially when they’re at different temperatures, so having them at the same temperature helps them come together better.
- Why are you using brown butter? This is one of the keys to the intense flavor of these cookies. The brown bits add so much extra flavor to the dough. Make sure to cool it down to room temperature before using because using hot butter will create for a greasy dough.
- Why are you using both dark brown and light brown sugar? I found through hundreds of cookie tests that this gives a good balance of sweetness and color to the cookies. Dark brown sugar gives that nice light brown color to the cookies as well as sweetness. I found that using only light brown sugar doesn’t give it the light brown color I like. And using all dark brown sugar makes the dough too wet and too sweet.

Method Tips
- Mix the butter, sugars, and egg thoroughly. The biggest mistake people make is not mixing the wet ingredients properly. When you mix the wet ingredients, especially the butter and sugar, you’re really trying to incorporate/dissolve the sugar.
- Don’t over mix the cookie dough after adding the dry ingredients. You want to mix the dry ingredients as little as possible because mixing encourages gluten formation which creates tough, chalky cookies. I like to mix the dough until there is a little bit of flour not incorporated into the dough. I then add the chocolate chips and finish mixing the dough.
- Why do I need to rest this dough so long? Resting/cooling the cookie dough allows the butter to solidify, so it doesn’t melt so quickly in the oven. This matters because if it melts too quickly in the oven, your cookies will spread more, creating flatter cookies. In addition, allowing it to rest makes it more flavorful. The cookie dough is sort of like marinating while it’s cooling.
- How do I make my cookies flat? How do I make them more chunky? This will depend on how much time you allow the dough to rest in the fridge. The more you chill the dough in the fridge, the chunkier the cookie will be. If you don’t chill the dough at all, the cookie will be very flat.
- For the best flavor chill for at least 24 hours. This is one of the biggest changes I’ve made in my method for baking cookies. The longer the cookie dough rests, the better the flavor and texture will be. This cookie dough can rest in the fridge for up to 72 hours. Personally, I do it for 24 hours because I simply can’t wait any longer! If you can’t wait 24 hours, I would recommend at least 1 hour, but the longer the better.
- Why is scooping your cookie dough with a scoop important? This is important because the scoop helps give your cookies their round shape. To get the perfect round shape, scoop the dough, press it into the scoop with your hand, and then level it off so you get a flat bottom.
- Why is cooling your cookies important? I know it is SO HARD to not eat a cookie right away, but your cookies are still baking when they’re on the baking sheet! The center will still look soft but it will slowly get firmer as it sits on the baking sheet.

Did you make this dish?
If you made this dish, I would love to see!
Follow Cooking Therapy on Instagram, snap a photo, and tag and hashtag it with @cooking__therapy and #beccascookingtherapy.
Stay connected and follow along on Facebook, Pinterest, and Instagram for all my latest recipes.
Disclaimer: If you purchase anything through a link on this site, I may receive a small commission from the purchase at no extra cost to you. I also only recommend products that I would personally use. Thank you so much for the support!
Get the Recipe:
The BEST Miso Chocolate Chip Cookies
Ingredients
- 1 cup +1 tbsp all purpose flour
- ½ tsp baking soda
- ½ tsp salt
- ½ cup unsalted butter
- ¼ cup light brown sugar
- ¼ cup dark brown sugar
- ¼ cup granulated sugar
- 1 egg, room temperature
- 1 tsp vanilla extract
- 1 ½ tbsp white miso
- 4 oz dark chocolate
Equipment
Instructions
- First, melt butter in a saucepan over high heat. Once melted lower the heat to low and cook until brown bits start to appear. Remove from the heat and set aside.
- Combine all purpose flour, baking soda, and salt in a bowl. Mix and set aside.
- Combine the browned butter, light brown sugar, dark brown sugar, and granulated sugar in a large bowl or the bowl of a stand mixer. Mix until combined.
- Add the egg and vanilla extract. Whisk for 5-10 minutes until the mixture becomes light and creamy.
- Add the white miso and mix until combined.
- Add the dry ingredients from step 2. Mix until just combined. Don't over mix the batter.
- Finally, add the dark chocolate and mix until just combined.
- Let the dough rest in the fridge for at least 1 hour. This helps the prevent the butter from melting too quickly in the oven and helps improve the flavor and texture of the cookie.
- Preheat the oven to 350 degrees F (177 degrees C). Move one oven rack to the top third and another one to the bottom third of the oven.
- Prepare 2 baking sheets by covering them with parchment paper.
- Use a 2 tablespoon (medium sized) cookie scoop to scoop your cookie dough onto the prepared baking sheet. Make sure there are 2 inches of space between each cookie.
- Bake for 10-12 minutes until the edges are light brown. Halfway through the baking process, move the baking sheet on the bottom rack to the top rack and the one on the top rack to the bottom rack. This ensures even baking for all cookies. You can also bake each baking sheet separately in the center of the oven.
- Rest for 10 minutes on the baking sheet and then another 10 minutes on the cooling rack before serving.
Notes
- How do I make my cookies flat? How do I make them more chunky? This will depend on how much time you allow the dough to rest in the fridge. The more you chill the dough in the fridge, the chunkier the cookie will be. If you don’t chill the dough at all, the cookie will be very flat.
- For the best flavor chill for at least 24 hours. This is one of the biggest changes I’ve made in my method for baking cookies. The longer the cookie dough rests, the better the flavor and texture will be. This cookie dough can rest in the fridge for up to 72 hours. Personally, I do it for 24 hours because I simply can’t wait any longer! If you can wait 24 hours, I would recommend at least 1 hour, but the longer the better.
- For more tips and tricks, see my tips section in the blog post.
- Storage Instructions. Cookies can be stored in an airtight container up to 3 days at room temperature and up to 6 months in the freezer.
These are now my go-to chocolate chip cookies! How many grams of flour do you use?
130 grams of flour
Absolutely delicious. My new fav chocolate chip cookie recipe!
I’m so glad this is your new fav! Thank you so much for trying the recipe!
do i combine with the browned butter while it’s still liquidy? or do i wait for it to rest to a softened, solid state?
You can combine it while it’s still liquid. I would let it cool for about 10 minutes first so it’s not so hot.
I’ve just baked your matcha white chocolate cookies yesterday and it was perfect! I am wanting to bake chocolate chip cookie this weekend for my friends, can I swap out the miso completely and not use them?
Yes absolutely!
So so good! I followed this recipe exactly and everyone loved it. We love the texture and how it’s not too sweet.
Hi Carissa. “Not too sweet” is the ultimate compliment in my book 🙂 Thank you!